
In this series, Chris Bank of UXPin – The UX Design App summarizes the different tools and medium that can be used for wireframing, the various levels of detail you can cover, and how to tie all aspects of the product together in wireframes.
In UXPin’s first article in this series, A Practical Look At Using Wireframes, we covered who uses wireframes, what’s their purpose and how do they work together. Now it’s time to cover the many ways you can make wireframes, what levels of detail you can provide, and how to tie all product details together in the finishing stages.

Wireframing
But first, let’s revisit the purpose of wireframing so the irresistible pictures below make sense. Wireframes are visual representations of an interface, used to communicate the following details to get everyone on the same page:
- Structure – How will the pieces of this site be put together?
- Content – What will be displayed on the site?
- Informational hierarchy – How is this information organized and displayed?
- Functionality – How will this interface work?
- Behavior – How does it interact with the user? And how does it behave?
Wireframing & Prototyping Convergence
There’s a lot of chatter about high-fidelity, functional prototypes, and MVPs these days – and for good reason: you know exactly what you’re getting. While that sounds sexy in theory, product teams can’t just go from 0 to 100mph in most cases – instead of making a Minimum Viable Product (MVP), you’ll make a Sucky User Experience (SUX).
Even elite designers, product managers, and engineers who are exceptional at conceptualizing high- and low-level details about a product on-the-fly need to wireframe in some way, shape, or form. And most product teams – small and lean, or large and bulky – still rely heavily on wireframing, using digital tools like UXPin or analogue ones like pencil and paper.
What we are seeing, however, is a convergence of tools for wireframing and prototyping, a blurring of traditionally distinct stages in the product development cycle to create a broadened spectrum of wireframe styles that allow teams to communicate at the level of detail and speed required.
50 Shades of Wireframes
Okay, so there’s probably only a few kinds of wireframes you’ll ever use. But if you count variations of medium and level of detail, you could probably get close to 50 – and it matters!
We covered this topic to some extent in The Aesthetics of Wireframes and the Importance of Context, but wanted to go deeper. Whether you’re aware of it or not, every shade, line, text, graphic, interaction that you add to a wireframes impacts how people interpret and understand the product concepts. Like English (or French if you’re looking for a more romantic language), wireframing is a language – for product design and development.
And as people across the World still debate semantics of their respective languages, product teams do the same – especially with wireframing. Over the years, I’ve heard the terms “sketches”, “mockups”, and even “prototypes” used synonymously with “wireframes.” To overcome much of this confusion, traditional wireframing tools have remained incredibly austere and carved out their own niche.
But the UXPin team sees this line blurring as product iteration cycles shorten, team composition and process varies more widely, and team members have more influence over communication and style preferences. The bottom line is that every team develops its own internal language, a slight variation from the norm, and wireframing is flexible enough to accommodate many styles to get the job done.
First, choose your tools & medium
Many pundits may disagree whether or not some of these tools and medium are relevant to wireframing, but if it looks like a wireframe and smells like a wireframe, we’re calling it a wireframe. No matter what anyone tells you, you can achieve the majority of your objectives in wireframing through any of these. We’re not here to hold you back with semantics – just get the wireframes done!
Sketching: You can sketch with anything that makes pigment on a surface. Because there are so many options, we gave you double the examples below so you could see the true breadth of tools and medium you could use. So get out your pens, pencils, markers, crayons, Paper App – even chalk or whiteboard markers – and start sketching!
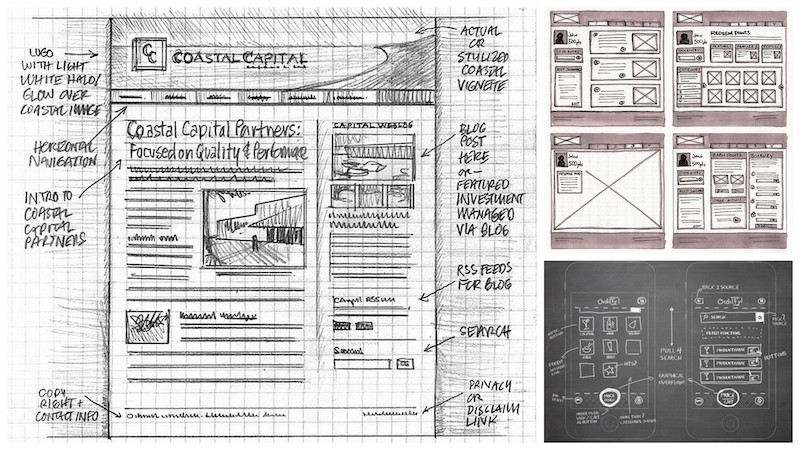
Image credit: Mike Rhode, Chris Stevens, Christos Chiotis
Paper Cutouts: You can use standard paper wireframing kits (which was the precursor to the UXPin wireframing and prototyping software), or simply cut out the sketches you’ve made on paper or another medium – you can always cut down edges later for “re-sizing”. Although this isn’t a wireframe, Common Craft’s famous Dropbox explainer video illustrates how fun this type of wireframing can be.
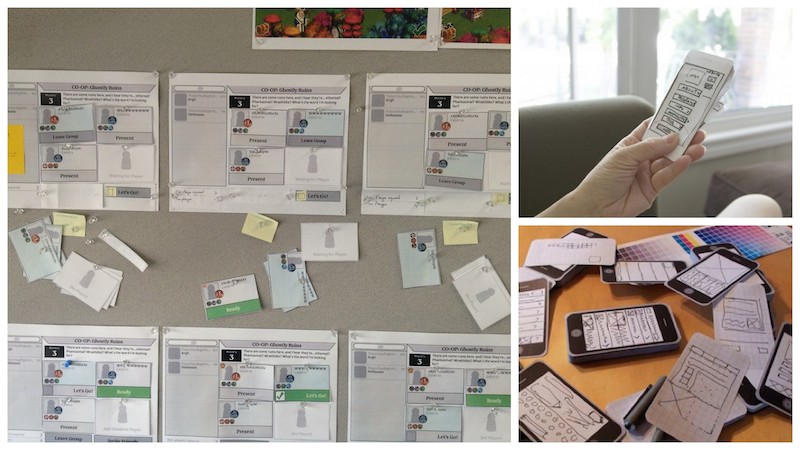
Image credit: Caryn Vainio, Winnie Chang, Adrian Kosmaczewski
Stenciling: There are many templates you can print out, stenciling kits to make your own, and full paper wireframing kits that come with standard paper elements like the UXPin paper product I mentioned above.
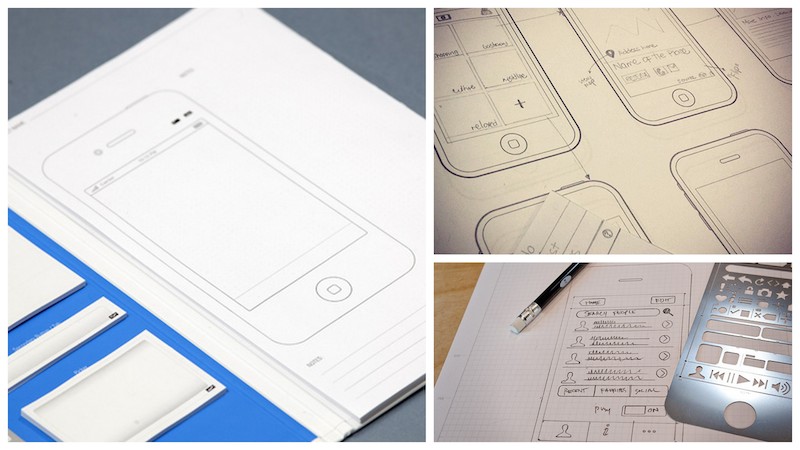
Image credit: UX Pin, Natalia Sourdis, iphonized
Wireframing Software: There are many digital wireframing software solutions that you can use, but only a few serious apps that are truly worth checking out, in our opinion — the rest tend to be limited, or have stopped innovating. To name a few products, UXPin, Balsamiq, Axure, and Proto.io are great.
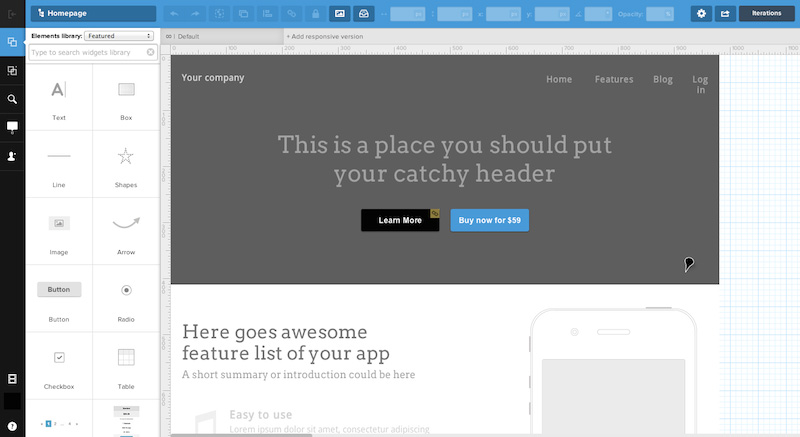
Graphic Design Software: There are many digital graphics software (free and paid) that could be used but the vast majority of designers and product managers use Adobe Illustrator, Photoshop, or Sketch for graphic design already – so those are clear winners if you choose to use them for wireframing too.
For many product teams, however, the better option is wireframing software because they’re focused solutions for wireframing, and a central medium for collaborating on wireframes and integrating with other tools that are important in the entire product design lifecycle. We will cover this in greater detail in the next part of this series.
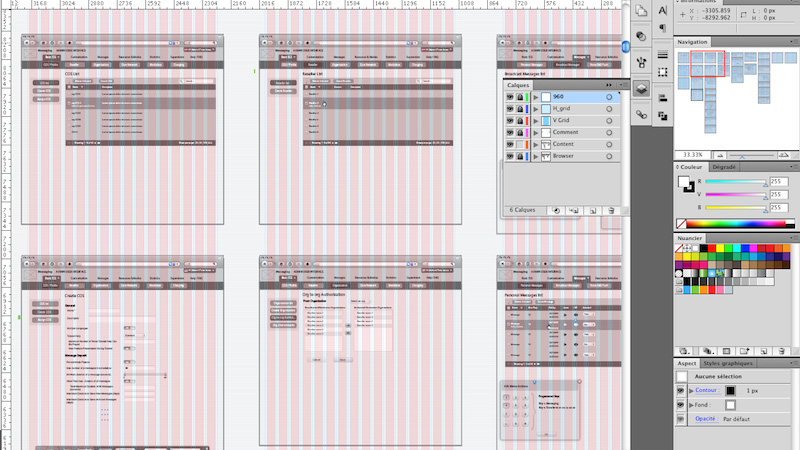
Image credit: Marc Decerle
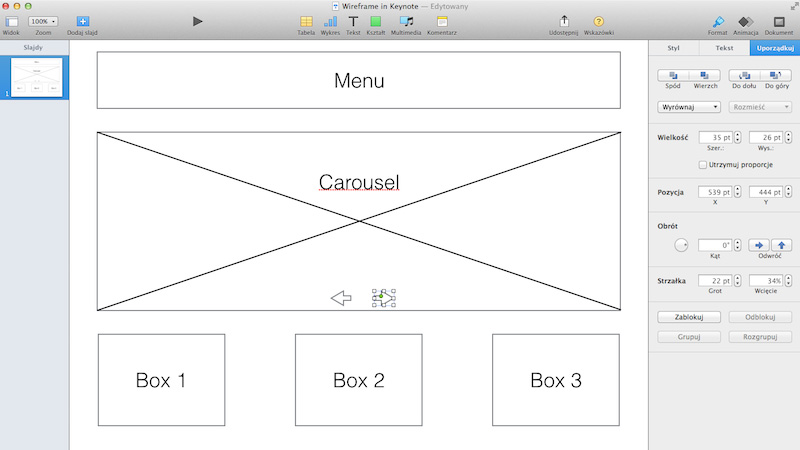
Presentation Software: Most people have used presentation software in their life – it seems almost mandatory in basic US education – and it’s even more common among business people. The broad familiarity of this tool makes it another great basic option for creating and presenting wireframes to teams. And you basically have two choices – PowerPoint or Keynote – and templates like Keynotopia exist to get you started.
Now Choose the Level of Detail
Barring limitations on the medium and tools you use, you should there are varying levels of detail you can dive into based on the stage the product design process and overall objective of the particular wireframe.
Block Diagrams provide the most basic but essential information about a wireframe: the layout and types of content or functionality you would like to present to your visitors. You can also set the information hierarchy and typography in this stage by adding text and varying the sizes to show emphasis or hierarchy. Just make sure to set your grid ahead of time to stay structured and help you visually tie together the elements in the beginning stage.
You can get creative in this stage since you’re at the beginning stages of setting constraints but keep in mind existing design patterns, overall objectives of the product, and any other constraints or user flows at this stage – because it’s easy to get off track if you’re working with an existing product or haven’t built an intuition around good and bad page layouts. And make sure that you that you don’t lose sight of the overall layout when adding text – it can bite you later on.
Unsurprisingly, you can create this level of wireframe with every tool and medium we mentioned above.
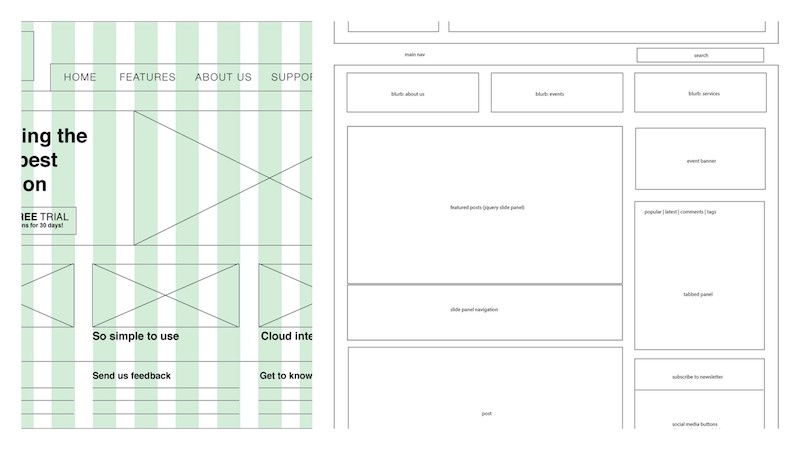
Image credit: Winnie Lim
“Grey Boxes” allow you use the full grayscale spectrum to emphasize the layout and particular elements without taking the time to choose a color palette or cluttering your wireframe with “lorem ipsum” text, both which may end up distracting you in the initial design steps. This may help you later on with the graphical design as well. It’s especially great for testing user flows and organizing graphical content, but can also be a personal preference over block diagrams or blocks with text.

Image credit: Winnie Lim, Paul Armstrong, Eu Diaz
High-Fidelity Text is one of several ways you can make a wireframe more realistic without going too granular into the graphical details. This may mean filling in the actual copy, the copy length, ideal font, sizing, weights, and so on. As with the other variations of high-fidelity wireframes, this level of detail about the product should be understood with little or no explanation – so you can move onto the next wireframe to keep the product design and development process going.
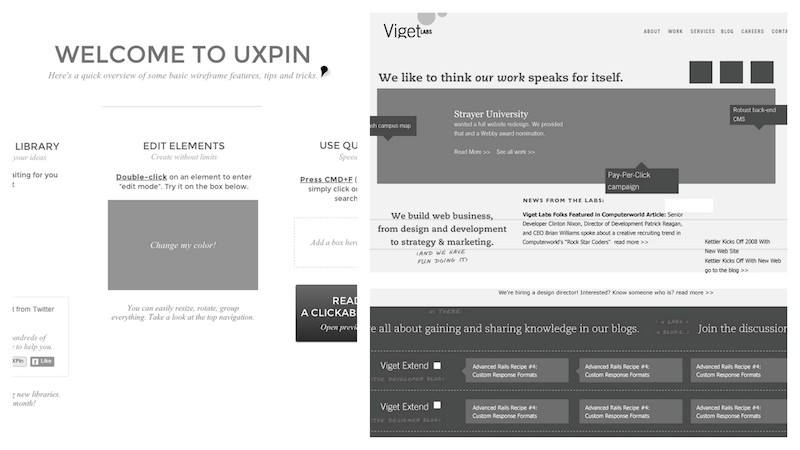
Image credit: UXPin, Viget Labs
High-Fidelity Color is another way you can make a wireframe more realistic without going too granular into the graphical details. This may mean filling in very specific background, button, text, or other colors to emphasize desired actions or user flows beyond what grayscale can offer. Be careful not to go crazy with the color or you risk both reducing the effectiveness of color “highlighting”, wasting a lot of time on making a pseudo-mockup that your graphic designer will ultimately replace, or making it harder to communicate other details of the wireframe to stakeholders because they’re distracted by the visuals — they may even perceive the wireframe as a bad mockup instead of a slightly more detailed wireframe.
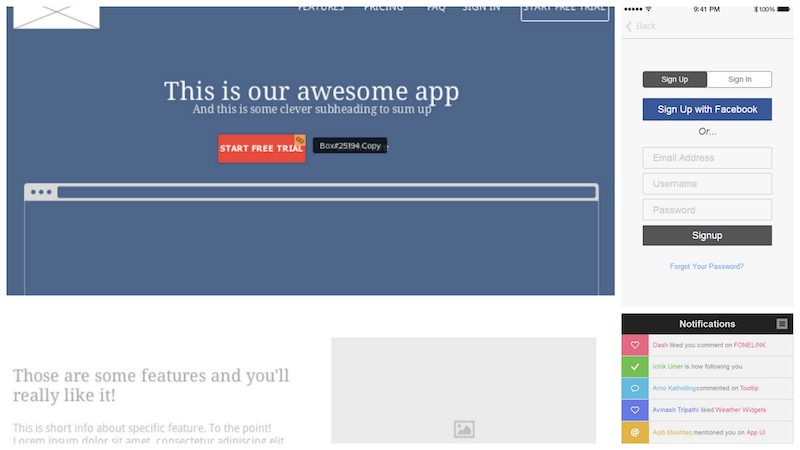
Image credit: UX Porn
High-Fidelity Media is another way you can make a wireframe more realistic without going too granular into the graphical details. This may mean filling in a picture, video, thumbnail, avatar, background image, or the like. This is becoming increasingly popular with the proliferation of content-centric products – one of the trends highlighted in UXPin’s Design Book of Trends 2013-2014 – since the type of content can have a significant impact on the overall structure and information hierarchy.
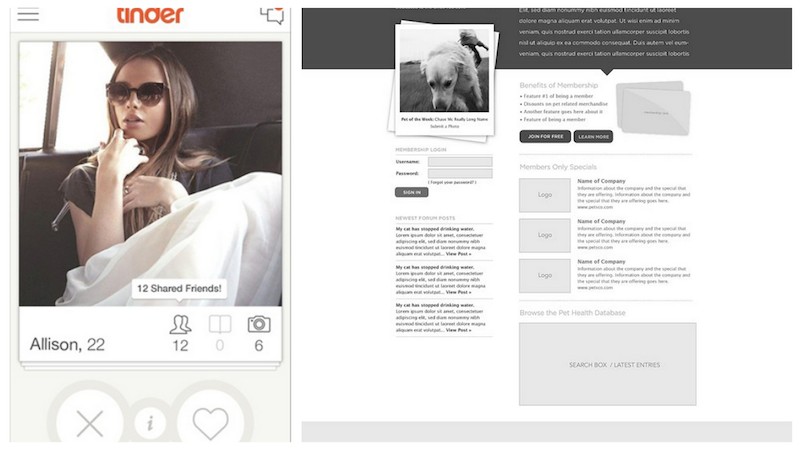
Image credit: UX Porn, Jesse Bennett-Chamberlain
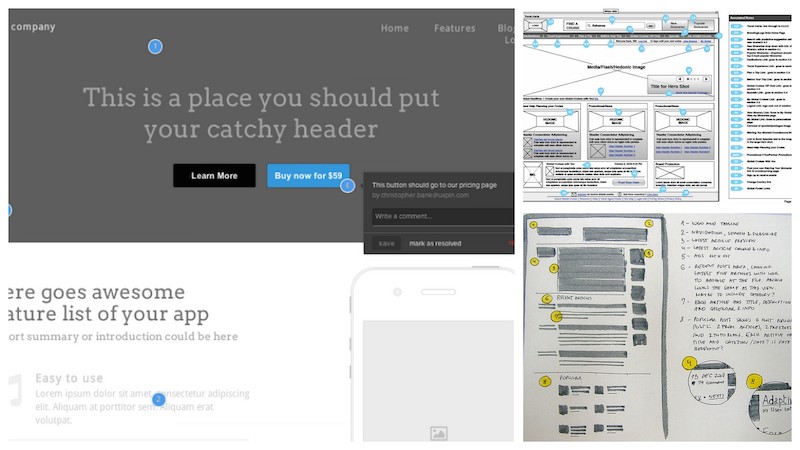
High-Fidelity Interactions are another way you can make a wireframe more realistic without going too granular into the graphical details. While we will cover adding interactions and click-through links to your wireframe later, this type of wireframe is more about visually showing interactions on a static wireframe. For example, pop-up windows, expanding or zooming in on content, and broadly showing swiping, scrolling, tapping and clicking interactions (see live example).
Finally, Tie Everything Together
Now that you’ve chosen the proper medium and tools, and have drawn out a wireframe or wireframes at the right level of detail, you need to add the finishing touches. Some wireframe details may need explanation, multiple wireframes may need to be tied together to show the user flows, while others may need to show interactions.
Basic Wireframes alone are only as good as your ability to produce the right level of detail needed to build or improve the product. Typically this isn’t sufficient alone, but can be in several scenarios. For example:
- You’re the one wireframing and prototyping or programming the product – you don’t need to cover every detail!
- Your graphic designer is more experienced and is given the freedom to interpret the wireframe with fewer constraints.
- You’re making very specific changes to the site that are well-understood and/or documented elsewhere, perhaps in a product requirements doc or wiki like Google Docs, or product management software like JIRA.
You’ve seen enough basic wireframes above so I’ll hold off on sharing more.
Annotated Wireframes are great for adding a broad range of details to any basic wireframe without cluttering it or risking scope creep – or missing the point completely. For example, although wireframes are the quickest and easiest way to specifying interaction, annotations are often necessary to communicates what happens when certain actions are triggered. Some examples of detail you can include:
- Functionality: clicks, taps, swipes, zoom, pop-ups, data inputs and outputs, etc.
- Content: text, fonts, layout, sizing, linking, graphics, multimedia, dimensions, resolution, etc.
- Behavior: animation styles, speed, and positioning, interactions, link destinations, etc.
- Key constraints: hardware, software, browser, data, etc.
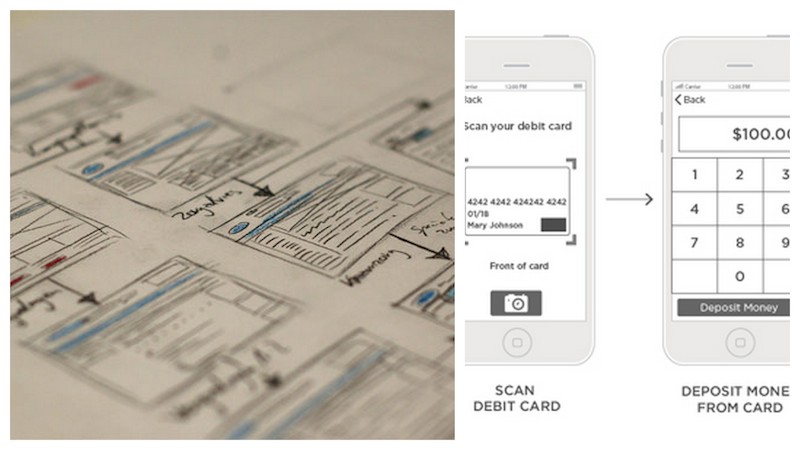
Image credit: Will Evans, Janko Jovanovich
Wireframes With User Flows are increasingly common as flowcharting and wireframing converge at the earlier stages of product design. Sometimes words alone cannot communicate a behavior, especially with user flows. They can look like traditional storyboards or more precise interfaces as wireframing tools evolve. In some instances, these wireframes are simply static views of a fully interactive wireframe. In other cases, it could be a slideshow or a collection of wireframes set side-by-side to show a primary user flow or set of user flows without detailing every link and flow.
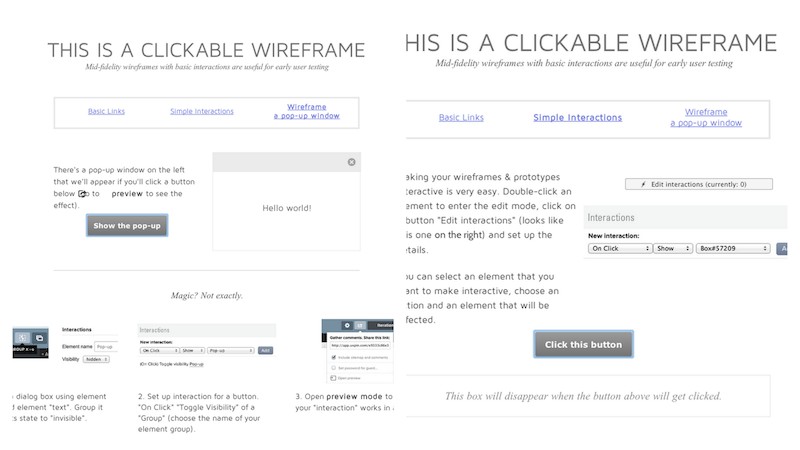
Image credit: Henk Wijnholds, Victoria Ngo
Interactive & “Click-through” Wireframes are as close to a prototype as you can get before final product – it’s like animating a storyboard. They allow you to actually experience interactions (ex: taps, clicks, and swipes) within or between individual wireframes instead of imagining the user experience through static wireframes and flows. Adding interactions before going to full mockups or even live prototyping can save significant designer and developer hours. This is a powerful variation of wireframes that can only be done in presentation and graphic design software, or wireframing and prototyping software like UXPin, Balsamiq, Axure, and Proto.io.
Unfortunately, we can’t visually represent this but you can always play around with some interactive wireframes in UXPin.
Practice Makes Perfect
Now that you’ve done your homework on how to think about creating wireframes, it’s time to put pen to paper and pixels to screens. I gave you a brief overview of the tools and medium you can use to create wireframes so you understand the breadth of your options.
In the next two articles — 4 Non-Digital Wireframing Weapons and 4 Digital Wireframing Weapons – I’ll cover each of their strengths, weaknesses, and next best alternatives so you know where to start. Many other articles only scratch the surface so I took the time to put it all in one place. Hope it helps!