
It has been more than a year since my first article “8 Photoshop Tricks I Wish I Knew When I Was a Student“. Since then, we have moved to CS6, with a whole range of new functionalities. In this article we will present some of those new functionalities with some little tips and tricks that have made my work easier.
You may wish to check out some other time saving tips and tricks for Adobe InDesign and Illustrator too.
Tricks and Enhancements for Working with Pictures
Content Aware Scaling with Area Protection
Let’s say you’ve got an image of a beach with a chair in it. You’d like to scale the beach, but you want to keep the chair as it is. With the “Content-Aware Scale” (found under “Edit”) you can do this in a few clicks.
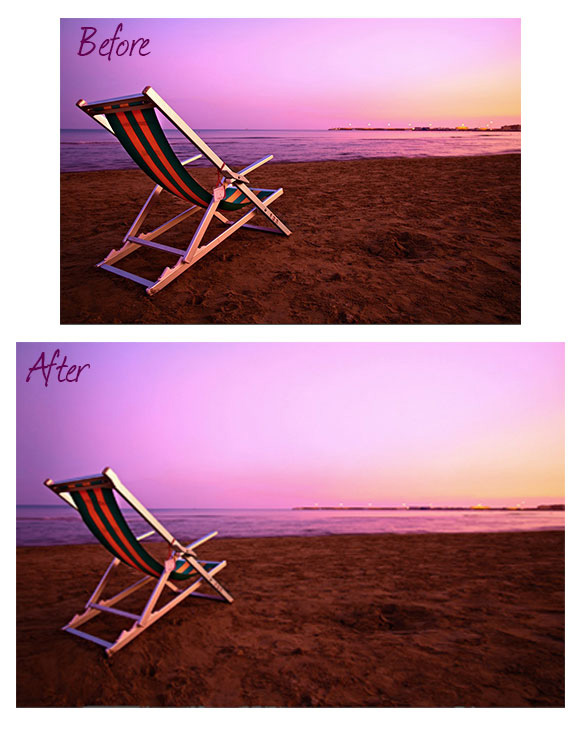
(Image credit: Moyan Brenn)
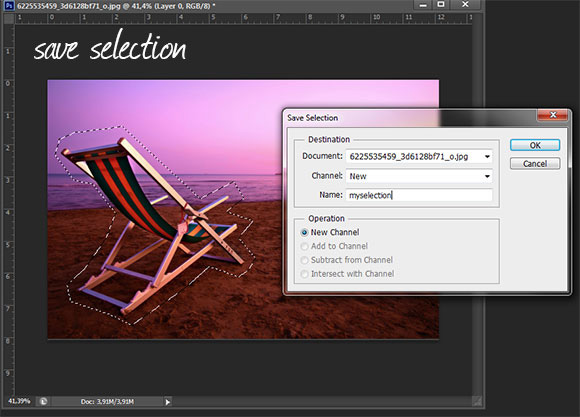
First, you’ll need to define the area you want to protect by creating a selection. you then save the selection under Select>Save Selection.
You want to make the beach bigger, so let’s make the whole document bigger, leaving some empty space you’ll fill next. Then you use the Content-Aware Scale.
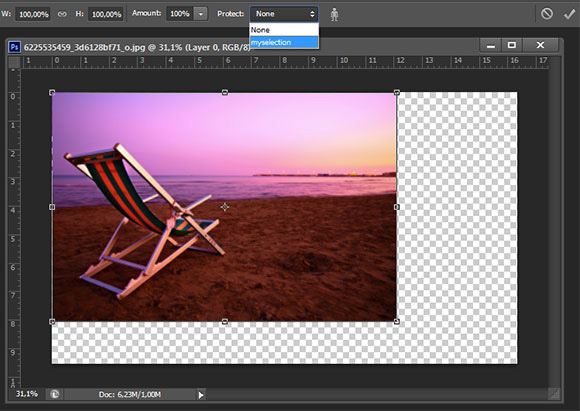
Under the Options, you will find the “Protect” dropdown, in which the selection you created before is listed. Select it, and now, you can resize the beach and the chair won’t move.
Content Aware Move Tool
Another tool added in CS6 is the “Content Aware Move Tool” which hides under the Spot Healing Brush tool. This tool enables you to make some small moves or changes to a picture using the CS6 algorithm to fill with some content aware pixels.
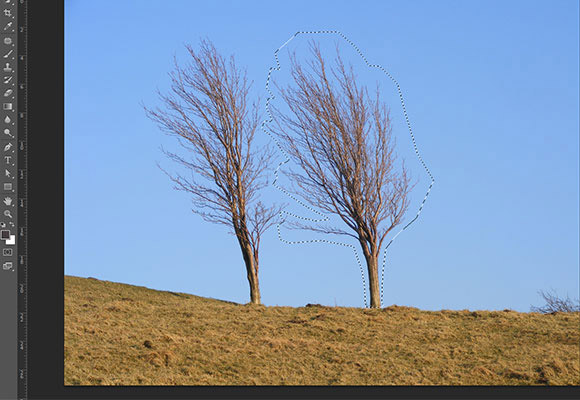
First you will have to create a selection. Then you will have to select the Content Aware Move Tool and move the selection some pixels away. You might have to correct some little details in the final result depending on the complexity of the image used.
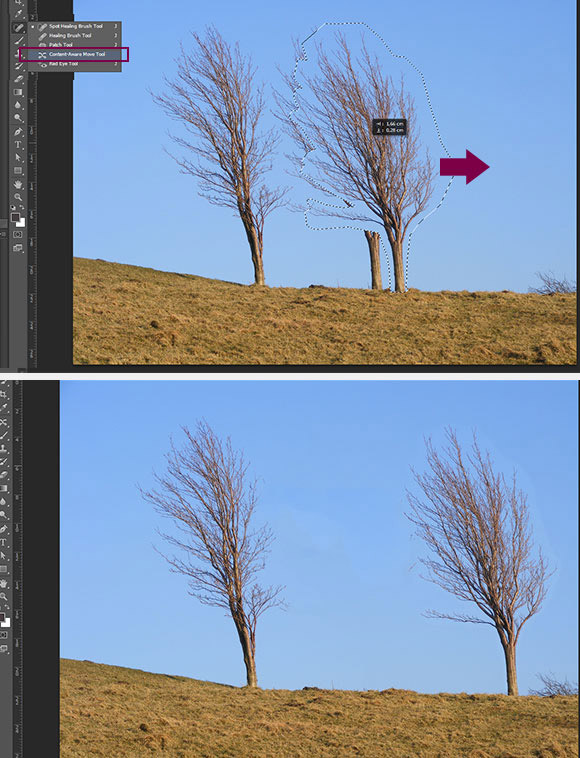
(Image credit: Pimlico Badger)
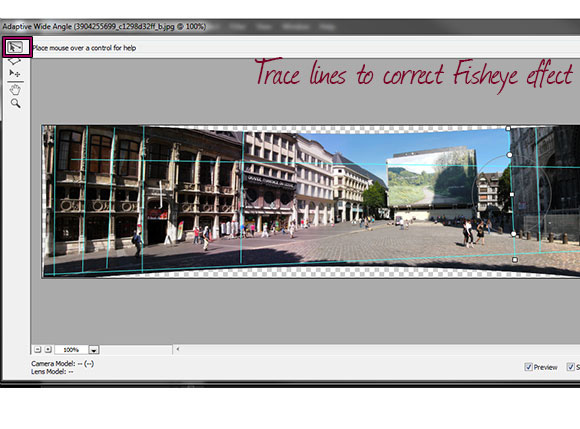
Adaptive Wide Angle Filter
If you are creating a panoramic image, you might come up with the “fish eye effect”. Photoshop CS6 has a special tool to correct this called “Adaptive Wide Angle Filter”.

To use the tool, open a panoramic image with some fish eye effect, go to Filter > Adaptive Wide Angle. This will open a dialog box.
You can now start tracing lines to correct the effect. First draw the horizontal horizon line, and then you can trace vertical lines to correct the fish eye effect on all parts of the picture that have curves. I
(Image credit zigazou76)
In our example, we have drawn many lines on the columns of the first building on the left, and on the edge of the church on the right. Then you just have to crop the final image.
Liquify Filter Enhancements
Remember the “Get Better & Quicker Control on Your Current Tool Size” tip? Using ALT+ right click, you could change the size of a brush. This is now available in the liquify filter. To change the size of the brush, simply hold ALT and right click of the mouse.

Now you can also save and load meshes using the related buttons.
Crop Tool Revamp
The Crop Tool in CS6 has some new functionalities that will help you a lot.
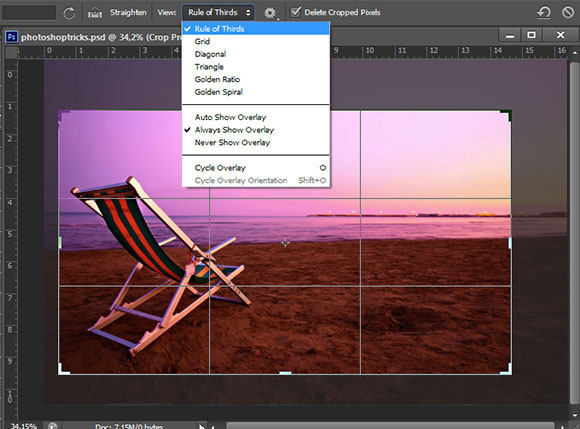
Now you can choose if you want to delete the cropped pixels or not using the checkbox in the option bar. You can also use some crop guides under the “View” drop-down in the option bar : rule of thirds, golden ratio or golden spiral among others, if you want to crop a picture nicely those guides will become pretty helpful.
Tips and Enhancements for User Interface Designers and Working with Shapes
Working with Groups : Vector Masks, Clipping Masks and Filters
The groups have been enhanced a lot in Photoshop CS6. Basically the effects, masks and filters you could apply on layers can now be applied to groups as well.
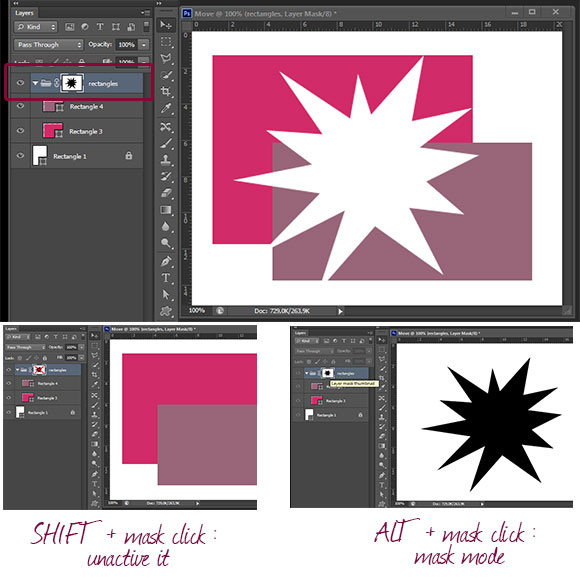
You can now use a layer mask on a whole group, and it will affect all the items of the groups accordingly. The shortcuts also work, you can use SHIFT+ click on the mask to inactive it, and ALT + click on the mask to switch to the mask mode and draw directly in it.
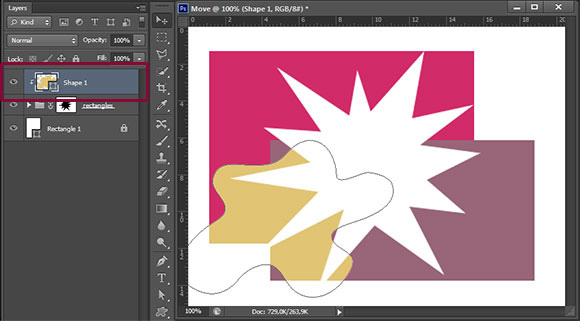
The clipping mask also now works on groups. You have to do the same as you would do for layers : right click on a mask > create clipping mask. Done.
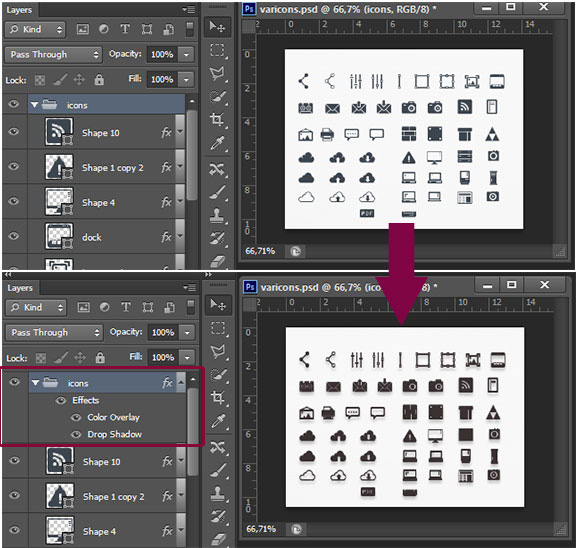
The filters can also be applied to groups now. This is pretty useful when you want, for example, to change the color of a whole icon pack (and add a drop shadow). Just select the group, and use the filter icon in the layer panel to add a filter.
Working with Shapes, a Lot of New Fun Things
As a UI designer, I have to admit that I really love CS6’s new features for shapes.
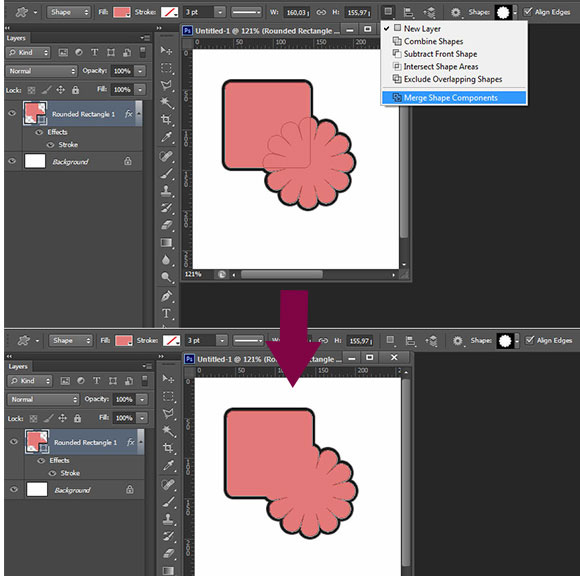
Now if you use CTRL + E on two shape layers, instead of creating a raster mix of both, it will combine them inside a single shape layer, keeping both shapes.
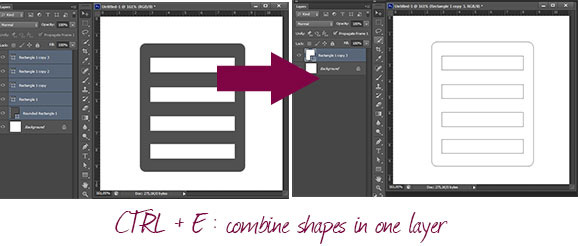
Once the shapes are combined, you can use the buttons in the option bar to change the combination options. The last “Merge Shape Components” button is a huge novelty and works kind of like the path finder for Illustrator, it merges shapes into one. You can now have very clean shape layers in Photoshop too.
Another improvement and Illustrator-like new feature is the ability to add some strokes to a vector Shape. This stroke is independent from the stroke filter (you can have both), and you can choose the width, style and color.
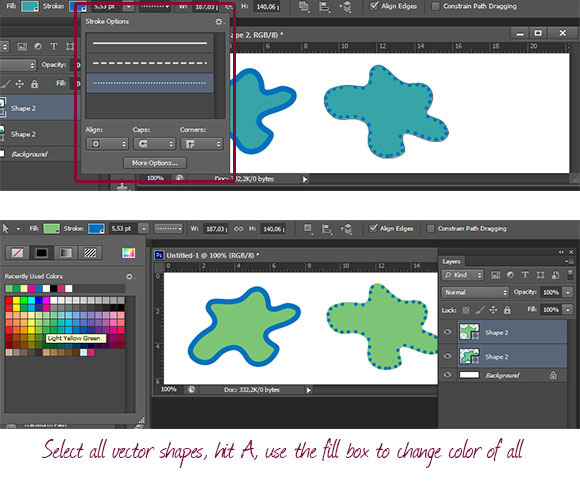
The last little trick I wanted to share with you, is the ability to now change many shape layer colors at the same time. To do that, select them all, hit the A key (to get the Path selection tool). Then use the “fill” box in the option menu, the color you will use here will be applied to all selected paths.
Hiding the Path
It’s possible to toggle the path of a shape by pressing CTRL + H. This makes it a lot easier to be able to see the correct effect when adding layer styles such as stroke or a drop shadow.

New Layer Search Filter
Photoshop CS6 comes with a pretty handy new tool for layer : the filter. You can now filter the layers by name, but also by effect, modes, attributes or colors.
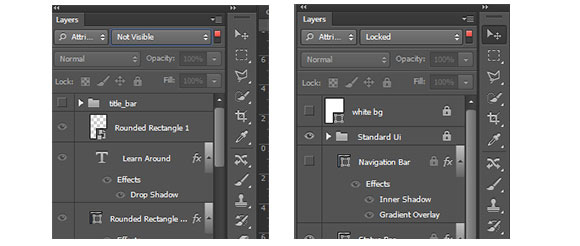
You can for example use the attribute “not visible” to find all hidden layers and remove them before sending the PSD to somebody who will need it.
Import/Export Brush and Settings
If you’re used to working on different computers, you will really like this new feature. In Photoshop CS6, you can import and export your presets. To do this, go to Edit >Presets > Export/Import Presets…
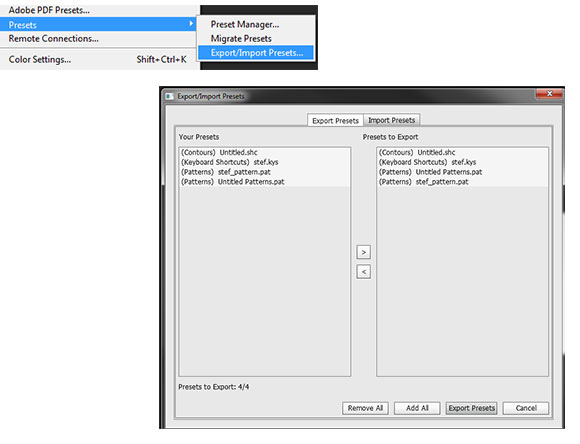
Then you will get a dialog box where you can choose which presets you want to export. Use the same dialog to import presets from another Photoshop.
New Paragraph Style Panel
If you are used to working with InDesign, you might already be familiar with this functionality. You can now use the paragraphs style panel to assign custom styles to text.
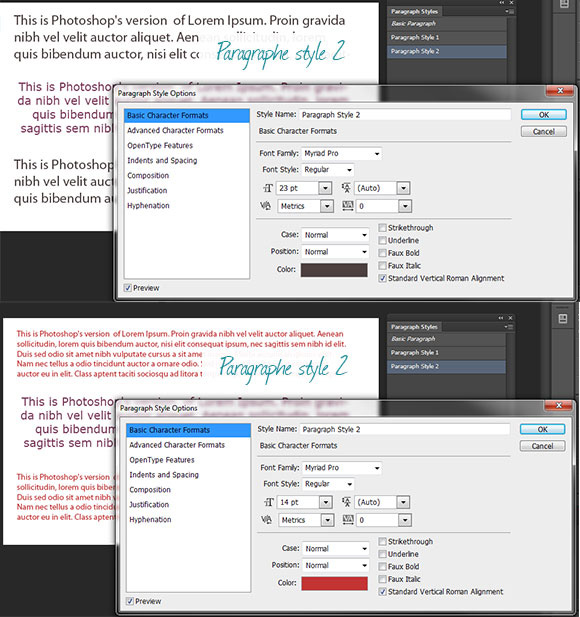
If you want to change the style of the paragraph, you can now edit the “paragraph style” and it will be applied to all other paragraphs that had the same style. Pretty useful isn’t it?
Conclusion
Those are the tricks and new tools in Photoshop CS6 that I now use on a daily basis. I hope you’ve enjoyed them. With some of those new tools, Photoshop has really pushed some boundaries to the next level, in particular in the field of pixel perfect UI elements design.
I’m sure there are plenty of other little features that I did not mention here, so please don’t hesitate to share your own tips and tricks in the comments section of this article!