
Currently, Git is one of the most popular version control systems among developers. You can use it to track changes in your projects and coordinate the work of multiple developers. Open-source projects also frequently use Git on platforms such as GitHub and Bitbucket. If you want to use it in your projects you need to learn a handful of Git commands that later you can run from a command line tool (CLI). Git has a great documentation and has a relatively flat learning curve as well.
In this article, I will show you the most frequently used Git commands for things like staging and committing changes, checking the status of your repository, creating a connection with a remote repository, and more. If you want to learn Git in-depth also take a look at the Pro Git handbook that contains everything you may want to know on the subject.

Git Tools
Most developers use Git from the command line, as it’s much faster. However, it’s only possible if you know the Git commands you need to use. However, Git also has several GUI clients you can use if you rather work with a graphical interface.
You can download the Git command line tool for the three major operating systems, Windows, Linux, and Mac, from Git’s official website.

Most Important Git Commands
1. Configure Git
After installing Git, the best thing to do is to configure Git on the global level, so later you won’t have to bother with that. For a basic configuration, there are only two Git commands you need to use—one registers the author’s name and another one their email. From then on, Git will save all the changes you make with these credentials.
git config --global user.name "Jane Doe"
git config --global user.email jane.doe@example.com
The first line configures the name, while the second line configures the email address of the author.
2. Initialize a Git Repository
After you installed the Git CLI on your system, navigate to the folder you want to use as a Git project folder (also called repository or repo). When you are inside the folder, type the following line into the command line:
git init
Now, your Git repo is initialized, which means Git has begun to track all changes you make in this folder. If you take a look at your File Manager you will find a new folder inside, called .git. This is the hidden folder where Git stores its configurations.
3. Check the Status of the Repo
You can check the status of your Git repository at any time with the following command:
git status
There are three states in which files inside your Git project folder can reside:
- staged
- committed
- modified
In the Git terminology, files are staged after you add them to the staging area, the place where you store the files you later want to commit. They are committed after a current snapshot of them was saved into the local database stored in the .git folder. And, they are modified after you made some changes to them but not yet committed those changes.
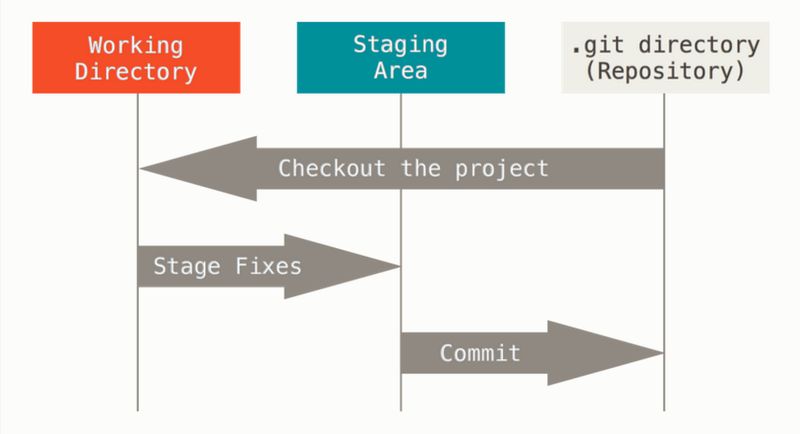
4. Stage Files
You can add files to your staging area by typing the following command into your command line:
git add index.html style.css images
This command stages the index.html and style.css files and the images folder. You can simply add all the files and folders you want to track after the git add command.
If you want to stage all unstaged files and folders in your working directory you can also use the following shorthand:
git add .
If you have a huge working directory it can also be a good solution to add all files at once and remove the few you don’t want to stage.
5. Unstage Files
You can also easily remove files from your staging area:
git rm --cached index.html style.css
If you want to remove folders as well you also need to add the -r flag to the command:
git rm --cached -r images
The command above removes the images folder from the staging area. Don’t worry that you miss something, Git has helpful error messages and it’s easy to revert anything back.
To remove all files and folders from the staging area at once, you can use the following shorthand as well:
git rm --cached -r .
This is the same dot notation you need to use when you want to add files to the staging area in bulk.
6. Commit Staged Files
You can save a current snapshot of your staging area at any time in the development process. The current snapshot you save is called a commit and you can return to it whenever you want.
git commit -m "Initial commit"
The above command commits the current state of your staging area. Note that you always need to add a commit message as well. I used “Initial commit” in the example which is a good message for the first commit. To make your Git repo usable, it’s best to always use a commit message that accurately and briefly describes the changes you made since the last commit.
7. Show Unstaged Changes in Detail
If you want to see all the changes that have been made in the Git repo you can quickly list them out by typing the following command into the command line:
git diff
This command doesn’t only return the file names but also the changes in their contents (in text format). The git diff command marks the additions with a +++ sign at the beginning of the line, while removals with a --- sign.
8. Display Your Entire Commit History
Git also allows you to display your entire commit history at any time during the development process. To do so, you can use the following command:
git log
The log contains the ID, author, date, and message of each commit.
9. Clone a Remote Repo
Using Git together with GitHub or another online repository is one of Git’s most frequent use cases. You can create a local copy of a remote Git repo by cloning it to your machine:
git clone https://www.github.com/your-online-repo
Before you perform the cloning, navigate to the folder where you want Git to save the new repo.
10. Create Connection to a Remote Repo
You can’t only copy a remote repo to your machine but also do the process in reverse. To copy a local repo onto an online server such as GitHub’s, first you need to create a connection to the remote repo, then push the local repo up to the server.
git remote add origin https://www.github.com/your-online-repo
With the above command, you can connect the remote repo to your local copy. In the future, you don’t have to type the full URL but you can refer it using the origin name (you can use another name as well).
You can also verify the new remote URL with the following command:
git remote -v
It doesn’t do much, just returns the newly registered URL so that you can check it.
11. Push Local Changes to Remote Repo
After you created the connection between the local and remote repos, you can push the changes online by using the following command:
git push origin master
The origin keyword stands for the remote repo while master stands for the local repo. If you are not on the master branch you need to use the name of that branch. It’s easy to find out which branch you are on, as the command line displays the name of the branch next to the name of the repo.
Git may ask for your GitHub username and password before performing the push.
12. Fetch Recent Changes in Remote Repo
If you already have the connection with a remote repo and just want to get the changes others have made you don’t need to clone the repo again. Instead, you can simply fetch the changes with the following command:
git fetch origin
The git fetch command just grabs the changes but doesn’t merge them into your local repo. If you registered another name for the remote repo (instead of origin) use that name.
13. Merge the Fetched Changes
When you are sure that everything is okay with the changes you have fetched from the remote repository, you can merge the fetches into your local repository. To do so, you can use the following command:
git merge origin/master
For merging, you always need to add the name of the branch you want to merge. For instance, in the above command, origin/master refers to the master branch of the origin (remote) repository. Don’t forget that before merging, you always need to fetch the changes by using the git fetch command.
Next Steps
Working with Git has some learning curve but it’s still worth learning, especially since modern web development is hardly possible without a reliable version control system. To learn more, take a look at our article about how you can save time while using the Unix Terminal. And, if you are still not sure why you should use GitHub we also collected its main advantages for you.
Besides, don’t forget to follow us on Twitter and Facebook so that you won’t miss out on our latest web development tips, tricks, and recommendations.


