
Google’s SMTP server is a free service that you can use to send emails from your custom domain, website, or web application. SMTP stands for Simple Mail Transfer Protocol. Basically, it’s an internet protocol for email transmission between servers. These days most emails are sent from an SMTP server. Anyone with a Gmail or Google Apps account can use Google’s free service, albeit it does have a daily sending limit.
In this article, we’ll have a look at how you can set up Google’s free SMTP server to send emails from a custom domain, a WordPress site, and a PHP server.
Why Use Google’s SMTP Server?
Having access to an external SMTP server has a couple of benefits. Most hosting providers (and sometimes ISPs, too) offer SMTP support, however this is not always the case. Even if you can send emails from your hosting account, you may bump into deliverability issues. For instance, emails sent from Google’s servers are less likely to be labeled as spam.
Besides, you have a secure (and searchable!) backup of your emails on Google’s servers. And, if you have more than one accounts you can manage all your emails from the same place, too. It can also be a godsend if you want to send emails from within your website or web application. WordPress even has plugins such as WP Mail SMTP by WPForms or Gmail SMTP for this purpose.
Some professional services such as newsletters, ebook download forms, and certain LinkedIn services also require users to have a custom email address. Meaning, they don’t accept email addresses ending in yahoo.com, gmail.com, etc. Having a custom email address enables you to access these services, too.
Sending Limit
As I mentioned before, Google’s free service does have a daily sending limit—it is 100 emails per day. After you reach the limit, you won’t be able to send more emails for the next 24 hours. Most likely, this amount won’t be enough for a bigger company. However 3,000 free emails per month is still an excellent option for many smaller players.
Google’s SMTP Server Settings
You need to use the following settings to set up your custom domain, website, or web application with Google’s free SMTP server:
Outgoing Mail (SMTP) Server: smtp.gmail.com
Use Authentication: Yes
Use Secure Connection: Yes (TLS or SSL depending on your mail client or website plugin)
Username: your Gmail or Google Apps email address (e.g. user@gmail.com or user@example.com)
Password: your Gmail or Google Apps password
Port: 465 (for SSL) or 587 (for TLS)
Google recommends setting up an App password for the account as well to make sure that the authentication works fine. Here are the steps of generating an App password if you don’t have one yet. Before generating an App password, you need to enable two-step verification for your Google account, too. You can use your App password instead of your Gmail password to log into your account.
1. Send Emails from a Custom Domain
To send emails from a custom domain, for instance, from an email address such as user@example.com, you need to be the owner (or manager) of that domain.
Log in to your account at your domain registrar and look for the email forwarding settings (different DNS providers might use different menu labels, but usually, it’s just called “Email forwarding”). When you find them, set up an email forwarder that forwards emails from your custom domain to your Gmail account. For example, from user@example.com to user@gmail.com. This way, you will receive all incoming mails within your Gmail account.
Now, you need to set up your Gmail account to send outgoing mails using the custom domain. So, you will create the email inside your Gmail mailbox, but it will be sent from the custom email address. Go to your Gmail settings page by clicking the little gear icon in the top right corner of your mailbox and select the Settings dropdown menu. Then, navigate to the Accounts and Import tab:
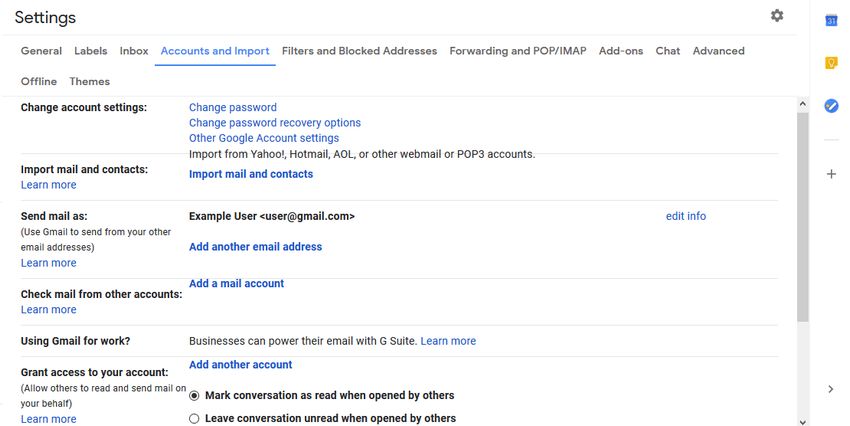
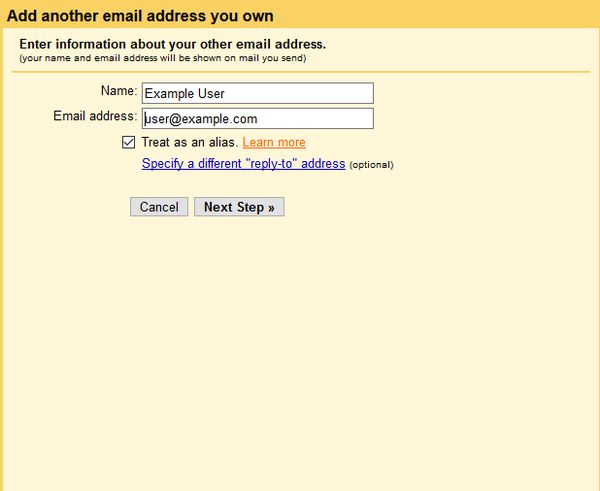
Inside the Send mail as setting, find the Add another email address option. When you click it, a popup like below will appear on the screen. Insert the details of the custom email address into the input fields:
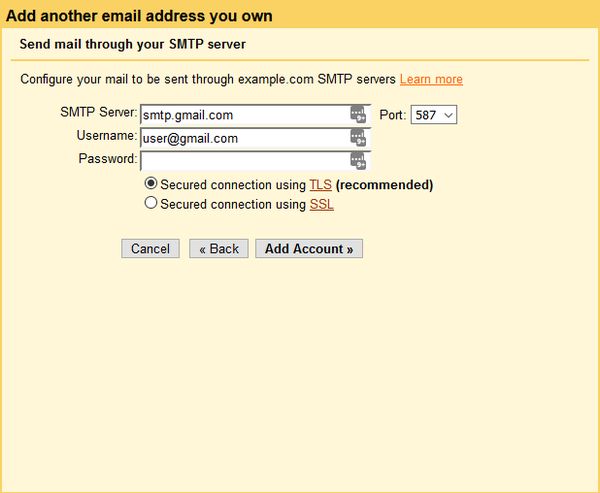
On the next page, you need to configure your SMTP server details. You simply add the SMTP detailed mentioned above in the article. Your username is your Gmail email address and your password is your Google App password (not the Gmail password).
After you add the alternative email address, Google sends you a confirmation code by email. Click the link or enter the verification code manually & you are done. Don’t forget that from now on, you need to sign in to your account with your App password.
Other Adjustments of Your Gmail Settings
These were the basic steps, however, if you want your custom email work perfectly with Google’s SMTP server, there are two other things you need to do.
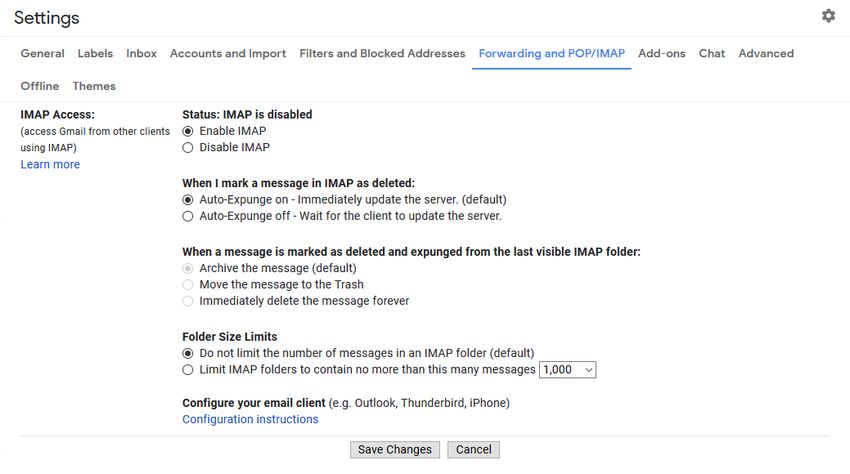
First, if you want a copy of your outgoing emails inside your Gmail account’s Sent folder, you need to enable IMAP. IMAP stands for Internet Message Access Protocol. Email clients use this protocol to retrieve messages from a mail server.
On your Gmail settings page, find the Forwarding and POP/IMAP tab and navigate to the IMAP Access option. Here, choose the Enable IMAP option and hit the Save Changes button.
Secondly, Google’s SMTP server automatically rewrites the From line of the email you send to the default email account. This can affect how your recipients perceive your brand and can meddle with the Reply-to settings of some email clients, so you might want to change it.
To do so, go to the Accounts and Import tab on your Gmail settings page and find the Send mail as option. Here, mark your custom email address as default:

From now on, your custom email address will appear in the From line inside your recipients’ email clients by default.
2. Send Emails from Your WordPress Site
WordPress allows you to send emails from their WordPress site. However, many website owners experience deliverability issues with the default wp_mail() function. For them, using an external SMTP server that sends the emails properly can be a lifesaver.
You can find a couple of SMTP plugins in the official WordPress repo. Here, I’ll show how you can use the WP Mail SMTP by WPForms plugin to configure your WordPress site with Google’s SMTP server.
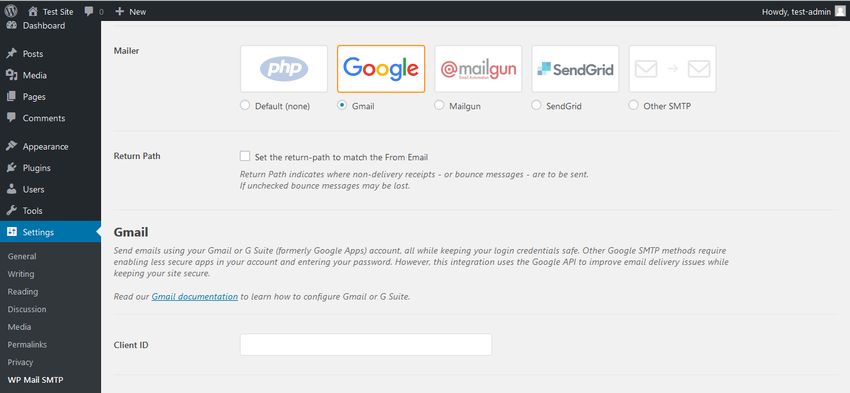
First, install and activate the plugin inside your WordPress admin area from the Plugins > Add New menu. Then, navigate to the plugin’s settings page by clicking the Settings > WP Mail SMTP menu.
The plugin has separate settings for Gmail’s SMTP server, so the configuration is quite straightforward. You only need to insert the login details of your Gmail or Google Apps account and that’s all. You can test the setup by sending a test email to yourself.
3. Send Emails with PHPMailer
You can also use Google’s SMTP server to send emails from a PHP server. You can find many popular email sending libraries for PHP. Here, I’ll show you how to use one of the most popular ones called PHPMailer. You can install PHPMailer on your server via Composer or manually (see the detailed instructions in the docs).
To configure PHPMailer, you need to edit the gmail.phps file you can find inside the examples folder. The .phps file extension stands for PHP Source and it’s generally used to store PHP code that can be opened in the web browser for educational or informational purposes. As the contents of a PHP source file can be viewed by anyone just like a regular text file, make sure that you don’t leave any passwords or sensitive data in this file.
Inside the gmail.phps file, you need to define the values of the Username, Password, setFrom, addReplyTo, addAddress, Subject, msgHTML, AltBody, and addAttachment properties. After you added your details, you need to rename the file from gmail.phps to gmail.php so that your web server can interpret it.
Then, run the script inside your browser. If the email was sent successfully you will see a success message. If something went wrong you can find how to solve the issue on PHPMailer’s troubleshooting page (some issues are surprisingly common).
Next Steps
With Google’s SMTP server you can send emails for free from a custom domain, website, or web application. Although the free service has a sending limit, it’s an excellent solution if you don’t want to send a huge amount of emails.
If you want to learn more about the business side of email marketing as well, don’t miss our article on the key elements of a successful email marketing campaign. And, we have a great collection of the best mailing list plugins for WordPress, too.